Click for part 2
Battle of Saint-Denis, 1837

The Lower Canadian Rebellion was a toothless attempt to fight the British Army out of modern-day Quebec. The standout success for the Patriote insurgents, was when they fought off a British assault at Saint-Denis. The rebellion kicked off on November the 6th and the Patriots established the town as their headquarters. Wolfred Nelson organised 800 volunteers to defend the town – half possessing firearms but just a few with the knowledge to use them. A coach house and brewery were incorporated into the defence as solid stone strongholds, and so they waited.
The British, inevitably, ordered troops to put down the rebellion and strike at their heart at Saint-Denis. In driving sleet one November night, Colonel Charles Gore, commanding 300 infantry and one 12-pounder cannon, marched out of Sorel towards the town 18 miles (29 km) south. Maybe it was the idea of fighting civilians, and on such a dismal winter night, but Gore’s men struggled with a lack of fortitude it seems. Upon arrival, Gore ordered a company and the cannon to occupy a barn within range of the coach-house. This they managed, but once the cannon was turned on the coach-house, the balls merely bounced off the building’s thick walls. 200 soldiers then advanced on the coach house but came under heavy fire and took casualties. The officer directing the assault, bleeding from the neck, ordered his men to fall back. Gore next tried approaching the town from a different axis but bumped into hundreds of civilians armed with firearms, clubs and pitchforks. Together with reinforcements, the Patriots fell upon their assailants. With the impotent cannon almost out of ammo, Gore ordered a retreat.
Casualties were trifling for both sides. Colonel Gore soon returned with more troops, but the Patriots had by then scarpered. The flame of Canadian rebellion was extinguished within a year.
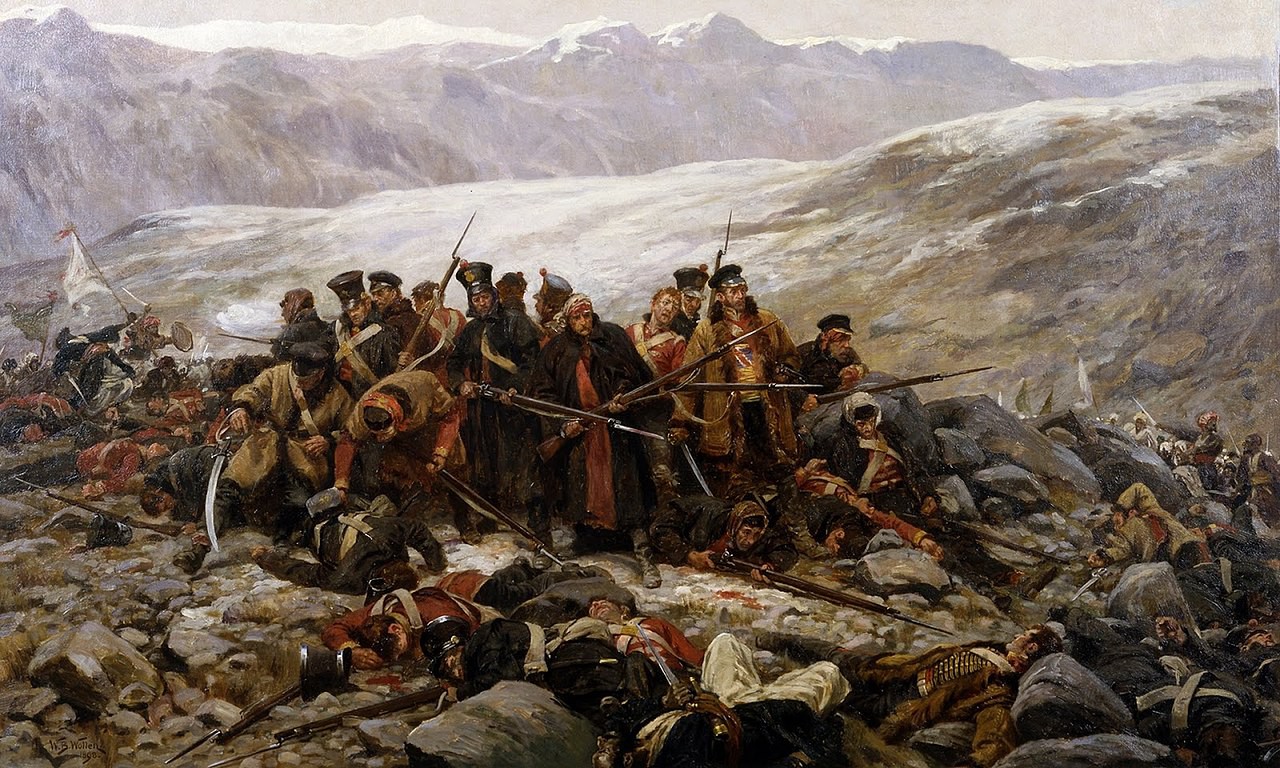
Retreat from Kabul, 1842

During the ‘Great Game‘ Britain greatly feared that the Russian Empire’s expansionism could spill into the Asian subcontinent. To counter this threat, they moved to establish a presence in Afghanistan (a buffer between the two empires) and install a pro-British regime. In 1839 a 20,000 strong army with 40,000 civilians in tow removed Dost Mohammad and replaced him with the pro-British Shuja Shah. For a time around Kabul all was peaceful, and so, many of the occupying regiments were returned south. Yet, a seething contempt for these infidels had been sown amidst the tribes of the hill-lands around.
In November 1841 open revolt broke out around Kabul. The British now realised how isolated and vulnerable they were. Their army’s strength was just 4,500 strong but 12,000 civilians still remained. Under Major General Elphinstone‘s limp leadership, British authority and security quickly deteriorated and the only course of action remaining was to negotiate a peaceful withdrawal. But they would be betrayed successively, despite repeated assurances. As they began their march towards Jalalabad, the largely defenceless mass of British-Indians was harried at every opportunity. Once they entered the Khyber Pass their fate was sealed. There, Afghan tribesmen ambushed and massacred them en-mass as the troops, including a battalion of redcoats, tried to fight a way through. Just one Briton made it back across the North-West Frontier. Most of 16,500 would never be seen again.
The annihilation left Britain and India in shock. Governor General Lord Auckland suffered an apparent stroke upon hearing the news. The reputation of the British East Indian Company was now cracked; “Men remembered Kabul” commented a British officer at the outbreak of the great Indian mutiny 15 years later.
Indian Rebellion, 1857
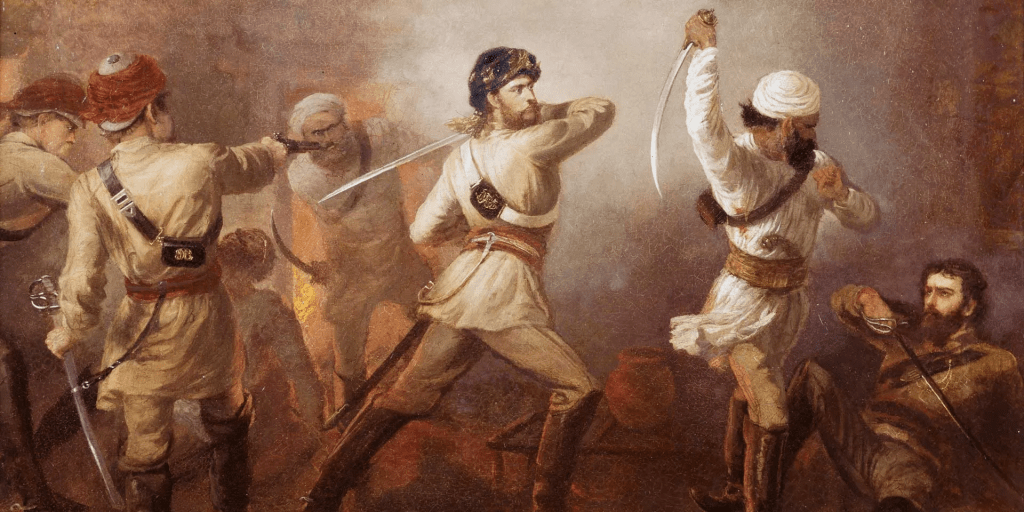
When security in Britain’s ‘jewel in the crown’ imploded in May of ’57, it incited panic throughout the halls of Westminster. One third of the entire Indian sepoy army was triggered into a mutiny with the potential to rip the heart out of the British Empire because, infamously, the paper cartridges for their rifles were greased with pig and cow fat, the handling of which was intolerable to sepoys Muslim and Hindu respectively. Of course, the true roots to this great uprising went much deeper.
It was a days’ ride north of New Delhi where sepoys of the 3rd Cavalry Regiment first turned on the British officers and their families in a frenzied spree of slaughter. From that spark, the mutiny spread like wildfire. The rebels moved to occupy Delhi in their tens of thousands and proclaim Bahadur Shah Zafar ruler of their rebel state, regardless of his wishes. Meanwhile, vast swathes of Crown territory in central India were suddenly no-go zones for the thousands of British soldiers and civilians. They fled, they hid, and were hacked down with little mercy when caught. Isolated units of British, cut off, held out desperately against bloodthirsty mutineers as the walls of their once orderly world collapsed around them. British High Command rushed redcoats away from other theatres of operation to reinforce British-Indian forces as they struggled to regain control. The prospect of laying siege to the massive walls of New Delhi lay ahead with its vast rabble of rebels.
A year later and the mutiny was stamped out but thousands of British including many women and children had been butchered, the stories of which dismayed the public back home. Many, many more Indians were also slaughtered in revenge, most of them victims too.
Battle of Ridgeway 1866
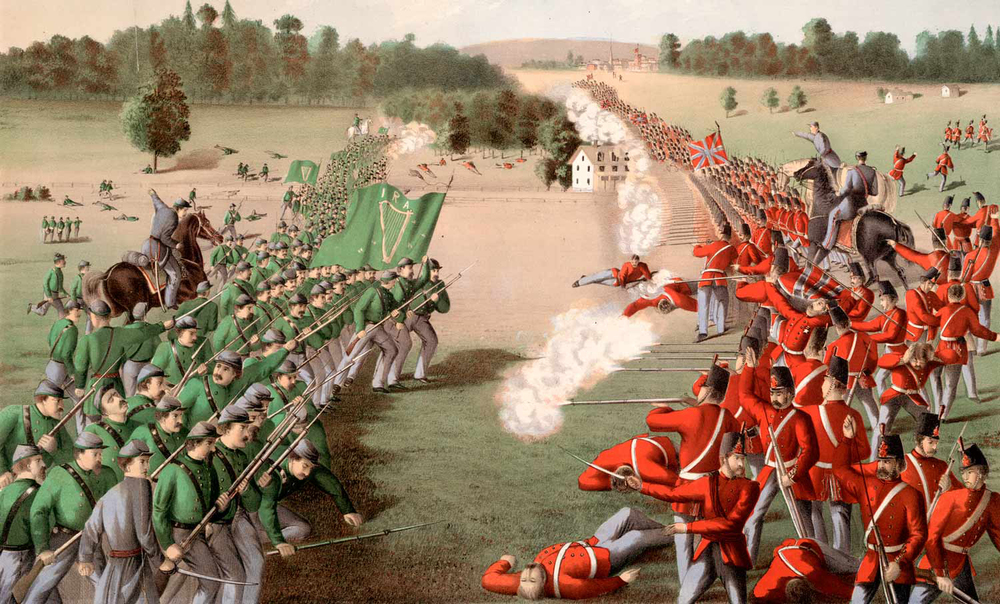
Like at Saint Denis (above), an embarrassing episode for Crown forces in Canada that wasn’t exactly the worst military setback to ever occur. Of all the many adversaries Britain confronted over the centuries, they faced an odd one near the Niagara Falls one June. The Irish-American Fenian Brotherhood had launched a campaign of raids into the Canadian Provinces with the aim of inducing enough of a strategic crisis in Westminster for them to withdraw crown forces from Ireland to compensate. Most raids came to naught. At Ridgeway, however, 900 British-Canadian redcoats were defeated in battle against a smaller army of Irish-American irregulars.
It appeared to be the professionals vs a rag-tag band of amateurs, but not so; the invaders were actually recently demobilised Civil War veterans whilst the Canadian soldiers were greenhorns. The Fenians managed to ferry many hundreds of men across the Niagara in the dawning hours of June before US Navy riverboats could intercept them. Once in Canada, they moved to secure Fort Erie before marching to face colonial forces at Ridgeway. There, battle was joined and the Canadians initially fought off Fenian skirmishers and appeared to be winning. But something went wrong. It’s not clear what happened but it appears Fenian mounted scouts were mistaken for charging cavalry. The Canadians tried to form a square formation to defend against it but in the disarray this caused, the Fenian commander seized his opportunity and ordered a bayonet charge. It completely routed them and the Fenians stood victorious. Another smaller Canadian force was then defeated. However further operations against provincial forces massing to confront them seemed futile so they slipped back across the border.
This embarrassing trouncing would shame the colonial administration into forging a more effective force with which to defend Canada that would become the Canadian Army.
Battle of Isandlwana, 1879

The British suffered a severe loss of face when a seasoned battlegroup was annihilated by an impi of spear-wielding Zulus in modern-day South Africa. By the late ’70s, the British implemented a scheme to consolidate their grip over Southern Africa but the independent Zulu and Boer nations stood in the way. The solution, of course, was to feign grievances the British could use to justify subjugating them through war. Zululand was first in the crosshairs and General Lord Chelmsford marched an army across the border at the years’ start. But King Cetshwayo reacted boldly and sent a force of 20,000 warriors to repulse him.
Chelmsford set up camp at Isandlwana. Aware that an enemy force was in the field, the hubristic general set out with the bulk of his army to find it. He was sure that the remaining force of 1,800 infantry, artillery, and various other units, including 700 British, had the firepower to fight off any Zulus alone. Yet the Zulus possessed a great warrior culture. They were mobile and highly-disciplined in battle. Deftly manoeuvring across the landscape, the large Zulu impi edged past Chelmsford’s force to arrive five miles from Isandlwana before it was detected. Once the cat was out the bag, they rushed towards the encampment. Minutes after scouts back in camp raised the alarm sentries abruptly spotted hordes of blacks swarming towards them in densely packed ranks. The infantry rushed to deploy in the ‘thin-red-line’ formation and deliver volley fire into the onrushing Zulus. For a while, they kept their enemy at bay. Their linear formation provided little defence for their flanks, however, and as the infantry began to tire the Zulus could be held off no longer. Dismayed, it became apparent the camp was being overrun. Thousands of warriors, running and shouting and stabbing, swarmed around beleaguered pockets of redcoats who stood forlornly before they fell.
A stunned Lord Chelmsford returned to the camp to discover the corpses of 1,300 slain, including 52 officers – more killed than at the Battle of Waterloo. Ultimately, the British Empire would win their war against the Zulus, but the martial prowess performed at Isandlwana ensured their continued independence from British imperialism, for a while at least.
Battle of Majuba Hill, 1881

The Boers would be a persistent thorn in Britain’s side during the late 19th Century. The British made the fatal error of assuming that an enemy army manned by rustic farmers was a third rate army by default. The Boer burghers, however, were excellent hunters and this meant that whilst they eschewed close combat they brought to the battlefield the kind of small arms handling more familiar to a ‘Tommy’ than a ‘Redcoat’. It took two bloody wars before the British subdued the Boers with a revamped military doctrine appropriate for the 20th Century’s dawn.
In the 1st Boer War, the British had been struggling to cow the Boers in battle for peace to be negotiated on their terms. After only a couple of months, though, it seemed the Boers could soon be brought around the negotiating table and this expensive conflict be brought to an end. Major General Sir Colley felt this was time to emphasise the strength of Briton’s position by occupying Majuba Hill. This summit rose 1100ft (335m) over a surrounding area of Boer defences and the General believed the Boers would abandon their defences as untenable. The General was wrong.
When 400 infantry appeared atop Majuba, the immediacy of the threat compelled Boer commanders Smit and Ferreira to fight, not flight. They quickly formed bodies of riflemen to dart up the hill; a hill actually considered by many unscalable for military purposes, and therefore Colley hadn’t bothered to dig in to defend. The Dutch commandos, swarming up the mountain using groundbreaking fire-and-movement tactics, decimated the British ranks with relentless sniping. Whilst the British soldiers were exposed and blind, their tormentors were hidden and well-aimed. The British were fighting a downhill-battle as if downhill themselves. Morale then went downhill and men broke ranks to follow it. As the Dutch threatened their flank, the rest of the British turned tail. General Colley paid for his inert leadership with his life. The British force of professionals was swept off the battlefield by a force of farming men and boys. A month later, the war was lost and Boers won their freedom from the grip of the Empire’s tendrils, for now…
‘Black Week’, 1899
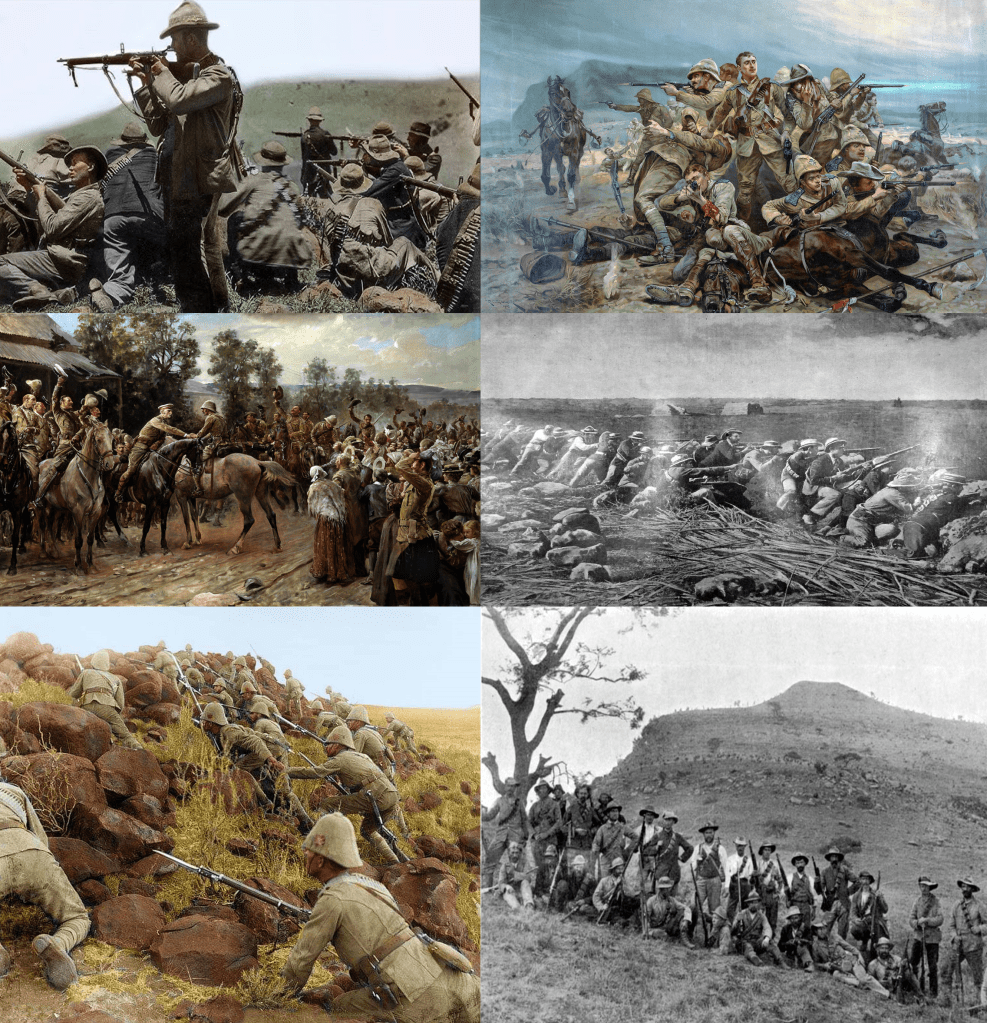
‘Black Week’ occurred soon after the start of the 2nd Boer War when the British suffered an unheard-of three successive major defeats. The Boers kicked off the war when its commandos marauded into British South Africa, cutting railway lines and laying siege to three cities. Naturally, the British counteracted and moved north in three prongs to relieve said cities, yet between the 10th-15th of December, traditional British army tactics failed in the teeth of the Boers’ excellent rifle fire and high mobility.
On the 10th, an all-arms force of 2,000 moved to retake a major railway junction at Stormberg and after an exhausting all night march where they got lost, they made a hasty assault the moment the enemy were sighted on a kopje. The assault immediately floundered, and before anyone could get any kind of bearings the troops retreated. They were chased back to their starting point by mounted Boers whilst the force’s flustered commander failed to realise he had left 700 infantry behind to be captured.
The next day a much larger force of 15,000 British assaulted 8,500 Boers at Magersfontein. The Boer positions were poorly recced and so the artillery bombarded the slopes above Boer positions merely alerting them to the impending assault. The British soldiers, headed by a highland brigade, advancing in pitch blackness and torrential rain, their ranks packed tightly, stumbled into rifle-fire range of the Boer positions. They opened withering fire and, within minutes, 700 men, including Major General Wauchope fell. The Highlanders were pinned down. Despite efforts to regain the initiative, by the afternoon the Brits were forced to fall back to lick their wounds.
And at Colenso, 15,000 redcoats blundered into Boer positions on the Tugela River on the 15th. One brigade with General Hart at the lead was misdirected and got jammed on the loop of the river where the Boers gleefully raked them with fire. Two batteries of artillery also advanced, unaware they were marching right into the burghers’ crosshairs. Fire erupted from a thousand-odd Boer rifles and scores of gunners were picked off in minutes. Dazed and battered, the army withdraw leaving behind almost a thousand dead and wounded, and more to be taken prisoner.
